
Article updated March 4, 2016
After my adventures in making cheap laminated Munzees to zap strap onto tree branches, or anywhere else I could hang them, I have started making my own Munzee stickers. I spent some time researching what to do in the Munzee Forums before I started. There are two prerequisites for making your own Munzee Stickers.
Laser Printer
The first prerequisite for making your own labels is a laser printer. You can make Munzees with an inkjet, and inkjet labels, but then you have to spray them with a fixative that prevents the ink from running when wet. If you miss a spot, your Munzee will be ruined by the first rainfall. By and large, ink-jet printer ink is water-based and will not last outdoors very long. So, you need a laser printer, or access to one. If you don’t own one, your local office supply store probably has a print department where you can have your labels printed for a nominal fee. They may ask to see the package your labels came in to make sure they are laser printer labels. Non-laser printer labels can gum up a laser printer pretty bad. Print on a setting for a heavier paper type than standard paper. I’ve had good luck using one of the heavier Glossy settings on the HP Laserjet I have access to. People on the Munzee Forums often suggest the card stock setting. The heavier paper types cause the laser to heat up a bit more than what is used for standard paper, making for a better print on vinyl label.
Sticky paper (aka Labels)
The second thing you need is label paper. There were two main suppliers that I saw recommended over and over again in the forums. Label Outfitters and Online Labels. For my first order, I chose a pack of 20 pages of Label Outfitters Vinyl Laser Labels, 2-5/8″ x 1″, Laser Only, Waterproof and Weatherproof, ordered from Amazon. With shipping and handling and exchange rate, my order came to about $25 CAD. I also ordered some sample OL713LP – 8.5″ x 11″ 1 Labels per Sheet Weatherproof Polyester for Laser which were free. Update: I’ve also started using 2″ x 4″ labels
2-5/8″ x 1″ labels have two uses – a wide, not very tall single Munzee, or two smaller half label Munzees. I have made several sheets of these so far and am happy with the results to date. They don’t stick to every surface, so I’m limited to relatively clean, smooth metal or plastic surfaces for the most part. Rough metal doesn’t seem to work as well. I can also squeeze 90/page if I’m printing small plain QR-code-only Munzees.
Update: 2″ x 4″ labels have several uses – I mainly use these to print 8 small Munzees per label for a total of 80/page.
8.5″ x 11″ labels can be sliced and diced in any manner you choose, and can accommodate up to 130 0.8″ square Munzees. I have not yet made any Munzees with this type of labels. I think I will probably experiment with some larger formats on this label stock. Update: I ended up print sheets of 80 Munzees on these, but I’ve come to prefer the labels instead of the full sheets.
Getting the Codes
The next thing I needed was a set of Munzee URLs to turn into QR codes. Back to the forums I went, and I stumbled on a method to mass-extract codes in Firefox. My browser of choice is Google Chrome, so I searched some more and found the Munzee Fix extension for Chrome. This let me easily copy my Munzee codes to the Munzee Skin Machine. Update: This plugin no longer works since Munzee switched to to HTTPS, so I’ve switched to using Firefox, GreaseMonkey 3.6 and the MunzeePrint 1.1 user script. Details below.
How to Create Munzee Stickers
Note, the original instructions no longer work since Munzee switched to HTTPS. These instructions have been edited to work as of March 4, 2016
- Install the 3.6 version of Grease Monkey Add-on into Firefox. Version 3.7 has some issues with installing scripts manually so make sure you click the link here to get the right version of GreaseMonkey.
- Download the MunzeePrint v1.1 GreaseMonkey script from My Dropbox here. I’ve provided the script on my Dropbox because it is no longer available from the original source on userscripts.org. I did not write this script, I’m only providing a copy since the original source is no longer available.
- In Firefox, Go to the File menu and Open the MunzeePrint.user.js file you downloaded from my Dropbox. GreaseMonkey should intercept the file and offer to install it for you.
- Now, open a new browser tab or window and Create a number of new Munzees. With the labels I bought, I can fit 60 on a page of labels, so I started by creating that many. You can create up to 25 at a time, but I’ve found that the Munzee servers often choke on that many. I’ve switched to creating batches of 10 at a time. They’ll be on your Undeployed page in your Munzee profile. Name them whatever you want since you can change it when you actually deploy them – if you want to that is.
- When you’re finished creating, it’s time to start “printing” your Munzees. On your Undeployed Munzees page, scroll down to the bottom and click the Batch Print button.
- If you’ve used the Batch Print feature previously, you will notice it looks different now. This is the MunzeePrint script doing some work for you. To speed things up at this point:
- If you’ve never printed any of your Munzees, you can simply click the Check visible button to select everything.
- If you have printed some Munzees and only want to print your newest Munzees, there is a search box to filter the list by typing the Munzee name in the filter field. Enter the name of your new Munzees and the list will filter down to only show the ones you’re interested in printing. Now click the Check visible to select those that are showing. If you created a bunch with different names, you can repeat this as many times as necessary.
- You can manually click the checkboxes if you want to as well but you may end up with a Repetitive Strain Injury
- When you’re done you should probably have 60 or 80 Munzees selected. The Print page will show you how many you have selected.
- When you’re finished selecting the Munzees to print, click the Go to Skin Machine button.
- A new tab (or window) should open in your web browser with Munzee Skin Machine loaded.
- For now, let’s go the easy route. Click the Easy button.
- Choose All Skins from the category selector and click Next. There are over 200 designs to choose from.
- For now, choose the Mini Skin by clicking the radio button underneath it. Scroll to the bottom and click Next.
- On the next page, you will see a large white box filled with the codes you selected previously on the Batch Print page, conveniently copied here via the MunzeePrint GreaseMonkey script.
- The next few options I set like this:
- Supress Munzee numbers – depends on whether or not you want the tiny little number below your QR code. Given the small size we’re printing, it is best to leave to check this box to hide the numbers.
- Fill in your Munzee username in the Deployed by box if you want your username on your Munzee. Given the small size QR codes we’re printing, I’ve found it is best to leave this blank.
- Change QR Code Color – I would avoid doing so as the high contrast of black on white makes the codes easier to scan. Adjust this at your own risk.
- Once you’ve entered all your codes, and set all the options. It’s time to generate some Munzees. Click Next. Then click Next again. Then, wait for the hamsters to complete your job.
- When they’re done, click the PDF Creator button.
- Select the label size you’re working with – in this case 1″ x 2 5/8″ Labels (5520) by clicking the appropriate tab. Alternately, the 2″ x 4″ labels (5523) tab if you’re using that size.
- Then select the option for 2 per label – 60 per page, which the Munzee Skin Machine will mark as Recommended if your selected skin is not too big. Alternately, if you’re using the 2″ x 4″ labels, select the 8 per label – 80 per page option which will be Recommended if your using an appropriately sized Munzee Skin.
- Click Create PDF and wait while the server generates your PDF file which will open or download when it’s ready depending on your web browser settings for PDF files.
- Personally, I prefer to download it and print it from the Adobe Reader software, but you might be able to print just as effectively from your web browser.
Time to Print your Munzee Stickers
Printing your Munzees requires a few more steps and some due care and attention. I can’t give specifics here for every printer – there’s just too many. Here are the basics.
- Your best bet is to Open your PDF file in Adobe Reader and select Print.
- Make sure you are printing at “Actual” size, and not at “Fit to page” or any other scaling setting.
- Print a copy of your labels onto plain white paper. You can line this and a sheet of labels up to a bright light source or day-lit window to check the alignment before you waste a page of labels. Adjust the scaling settings if the printout doesn’t align with your labels.
- Back in Adobe Reader, select Print again.
- This time, dive deeper into your Printer settings and make sure you find the option for your printer to set the Paper type to a heavy Glossy or Card Stock.
- Make sure you use the bypass tray (if your printer is so equipped) as that usually gives a straighter paper path. This means there’s less chance of your labels getting peeled off by the laser printer!
- Print your labels.
Updated: Once printing is complete, let the labels sit for a few minutes to cool down. Then, take a straight edge or ruler, and an sharp knife to the page. If your hands are steady, you can use scissors too. It’s time to slice and dice your labels up into useful segments. My preference when I first wrote this was to also slice the resulting vertical strips of 10 into shorter lengths of between 3 and 5 stickers per strip as they fit in my pockets better. Now that I primarily use the 2″ x 4″ labels, I cut them into vertical strips, then cut them down the middle of each label. This gives me strips of 2 labels with an easy way to peel them from the sheet. The Munzee at top and bottom of the strip come out as singles with the paper from the margin making them easy to peel too.
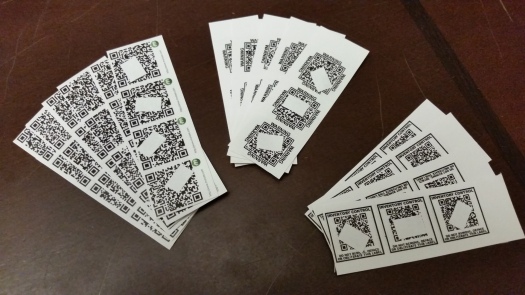
Here’s a sampling of a batch I made today. Since the pack of 20 sheets of labels cost me $25, each sheet is worth $1.25. Assuming printing costs of $0.25 for the page, and if I put 60 labels on that page, they’re worth $0.025 per Munzee. If I print at the larger, one-per-label size, they’re $0.05 per Munzee. Not a bad deal considering ordering Munzees online costs anywhere from $0.30 per Munzee and up.
Update: I recently purchased 100 pages of the 2″ x 4″ labels for about $71CAD. Since I can get 80 labels per page, that means I can print 8000 Munzees at an average cost per sticker of less than 1 penny each!!!
Enjoy your new Munzees, and Grow the Map!

On the 2″x4″ labels, I cut lines vertically down the page to make long strips of 10 Munzees. Next, I cut across each strip between two Munzees – NOT on pre-cut lines!! This leaves me with 4 pieces with two Munzees on each piece, with a pre-cut line between them. This makes them very easy to peel a Munzee off the backing paper. The label on the top and the bottom has a similar setup – except the extra space from page margins is on one side of the pre-cut line. I’ll be printing a batch later today and I’ll take some photos while cutting up the labels.
The one warning I have with this is – don’t get the backing paper wet. If you do, it becomes virtually impossible to peel the label off the backing paper – even after it dries. Try to keep them dry if you’re out deploying in the rain (as I often do).
LikeLike
Thanks for the tutorial. The actual printing is easy enough, but how to you separate them? I’ve printed up sheets and then tried scoring them with a knife. I’ve cut the scored sections into little strips of 4 or 5 that I can carry into the field. Problem is, sometimes I can get the Munzee off the strip and sometimes I can’t…it pulls the backing paper along with it. Any suggestions?
LikeLike
Awesome tutorial! My only issues occurred when it came to saving as a PDF. I kept on getting an error when I would try to do the 1″ x 2 5/8″ 60 per page PDF. I checked to see if I could do it on the 2″ x 4″ labels and it worked, but unfortunately the labels I have are the 1″ ones. Any thoughts?
Thanks!
LikeLike
I’ve heard people have been having problems with some sizes, and it doesn’t seem the owner is monitoring it very well.
LikeLike
Please, make tutorial how to make homemade *waterproof* munzee stickers
LikeLike
If you follow these instructions, your stickers are waterproof. The secret lies in using Vinyl stickers as mentioned in the post.
LikeLike